Responsive web designs deliver an optimal viewing experience to users of touch-enabled handheld devices, without the need to zoom in/out and pan. Given that more and more web content is delivered in this way, it is becoming increasingly common for native iOS apps to embed web content within the app using a UIWebView. On the iPhone form factor, the embedded web view typically occupies the entire screen, and things work quite well in the UIWebView without a lot of extra coding. We may need to add some minimal browser chrome to handle interaction within the displayed web content. For example, if a user clicks on a displayed link, it would be nice to support a back button so they can get back to the web view’s initial state. Since the web view controller is often managed by a UINavigation, it make sense to replace the “back” button on the nav bar when the user clicks on links within the UIWebView. The technique we will use in this article was inspired as usual by stackoverflow.com. When using this approach on the iPhone, a new UIWebView gets created whenever we push to this screen, which eliminates the need to worry about “stale” browsing history when the view appears as well.
Using UIWebViews on the iPad introduces a couple of interesting issues, particularly when the UIWebView occupies part of the screen, or the size of the UIWebView’s frame might change over time. First of all, if the content the UIWebView is displaying changes based on interactions with content elsewhere on the screen, we need to deal with any history the UIWebView has accumulated (e.g. get rid of it when the context changes to avoid confusing the user!). Second, if the frame size changes, we need to make sure the web content resizes within the view as well.
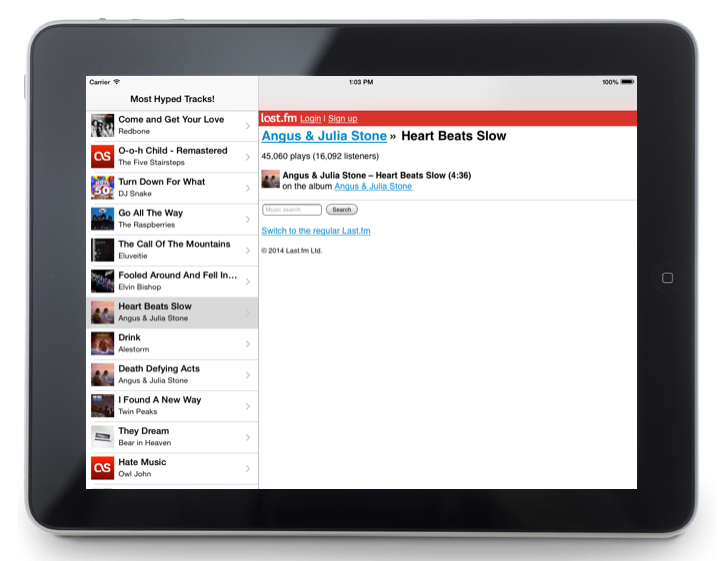
In the remainder of this article we will demonstrate both of these problems, and how they can be addressed. We will use a simple universal app that fetches and displays the most hyped tracks listened to by users of the Last.FM music social networking site. We created the project using the “Master-Detail” application style in Xcode. On the iPad, this app uses a UISplitViewController to manage a master list of the most listened to tracks is displayed. If the user touches a track on the master list, the responsive content for that track on last.fm is displayed by the detail view controller within an embedded UIWebView, as shown in the screenshot above.
The first thing we need to do is expand upon the back button concept we stole from the StackOverflow article. Since the master and detail view are displayed simultaneously on an iPad in landscape orientation, there is no “back” button on the navigation bar as we have in the iPhone design. Hence, we’ve chosen to add a back button to the navigation controller’s toolbar, for the iPad. This button will only appear when the UIWebView has history.
- (void)viewDidLoad
{
    [super viewDidLoad];
    if ([[UIDevice currentDevice] userInterfaceIdiom] == UIUserInterfaceIdiomPad) {
        UIBarButtonItem *backItem = [[UIBarButtonItem alloc] initWithTitle:@"Back" style:UIBarButtonItemStylePlain target:self action:@selector(backPressed)];
        NSArray *toolbarItems = [NSArray arrayWithObjects:backItem, nil];
        [self setToolbarItems:toolbarItems];
    }
}
Now to provide the back button behavior, we have the UIViewController managing the UIWebView implement the UIWebViewDelegate as follows.
- (void) updateBackButton
{
    if ([[UIDevice currentDevice] userInterfaceIdiom] == UIUserInterfaceIdiomPad) {
        if([self.webView canGoBack]) {
            [self.navigationController setToolbarHidden:NO];
        } else {
            [self.navigationController setToolbarHidden:YES];
        }
    } else {
        if([self.webView canGoBack]) {
            if(!self.navigationItem.leftBarButtonItem) {
                [self.navigationItem setHidesBackButton:YES animated:YES];
                UIBarButtonItem *backItem = [[UIBarButtonItem alloc] initWithTitle:@"Back" style:UIBarButtonItemStylePlain target:self action:@selector(backPressed)];
                [self.navigationItem setLeftBarButtonItem:backItem animated:YES];
            }
        } else {
            [self.navigationItem setLeftBarButtonItem:nil animated:YES];
            [self.navigationItem setHidesBackButton:NO animated:YES];
        }
    }
}

-(void) backPressed
{
    if([self.webView canGoBack]) {
        [self.webView goBack];
    }
}

- (void) webViewDidStartLoad:(UIWebView *)webView
{
    [self updateBackButton];
}

- (void) webViewDidFinishLoad:(UIWebView *)webView
{
    [self updateBackButton];
}
For the iPad, we simply make the toolbar visible/invisible as needed, but for the iPhone we handle the UIWebView back functionality by co-opting the navigation controller’s back button. This approach provides an intuitive way to support interaction within the web view (e.g. clicking on links and backing off to previous pages.) We still have a bit more work to do on the iPad to deal with the UIWebView’s leftover history.
Consider a scenario in which the user selects a track on the master view. The corresponding web content will be displayed within the detail view on the right. Next, the user clicks on a link or two within the web content. The UIWebView now has history associated with it, and our back button will be visible on the toolbar. At this point, if the user selects a different track in the master view, the content for that track will load, but notice that the back button is still displayed! If we click on Back, we will actually land on history that accumulated prior to selecting this track that likely has little to do with the track we have selected! This is going to be confusing to the end user, and should be addressed. When selecting on items in the master view, the UISplitViewController is not reloading the detail view controller. It is simply reusing the one that is already displayed! Hence, we need to find a way to clear out the history of the UIWebView anytime a different track is selected.
Unfortunately, there is no API that allows us to do this, so we need to use a different approach. Our approach is to simply remove the old UIWebView instance from the view hierarchy and replace it with a brand new UIWebView instance. This can be accomplished with the following code that is invoked by the UIWebView’s controller whenever its “model” data (e.g. the URL it is displaying) get’s changed by the master view controller.
    // automatically replace the webview everytime a new web url is set on iPad.
    if ([[UIDevice currentDevice] userInterfaceIdiom] == UIUserInterfaceIdiomPad) {

        // allocate a new webview
        UIWebView* newView = [[UIWebView alloc] init];
        newView.frame = self.webView.frame;

        // remove the old view from the superview, and add the new one.
        [self.webView removeFromSuperview];
        [self.view addSubview:newView];
        self.webView = newView;
    }
The last detail we need to take care of is to make sure the content in the web view renders correctly when we switch orientations and the size of the web view changes. See the figure below.

When we switch orientations, the web view is not resizing properly so the web content is not displayed correctly.
There are a couple of things we needed to do to get this to happen. First, we added autolayout constraints to pin the webview to the left/right/top/bottom of the containing superview. In addition, we set the following property on our UIWebView.
self.webView.autoresizingMask = UIViewAutoresizingFlexibleWidth | UIViewAutoresizingFlexibleHeight;
The complete source code for this example program is available on GitHub.